服務與方案

3CX客戶關係管理組件
3CX CRM Configuration
CRM Settings
This section allows you to change general CRM settings:
|
Screen Pop-up. The screen pop-up is automatically shown when an inbound call arrives to your extension, displaying the contact information. You can configure the screen pop-up behavior to: |
|
|
| Outbound Calls. When launching outbound calls directly from your CRM, you may add a prefix in order to select a route in 3CX Phone System. This avoids the need of editing contacts in your CRM to include the external line prefix. 3CX CRM Integration Startup. Here you can configure this module to be automatically launched when Windows starts. 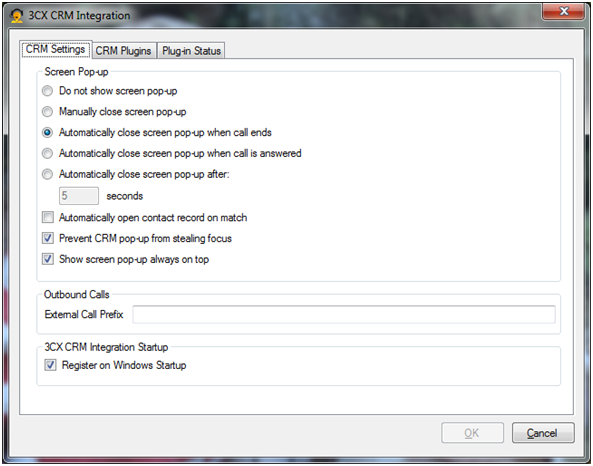 |
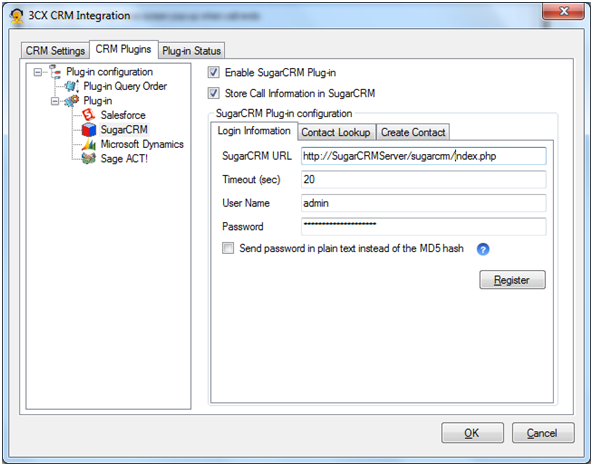
CRM Plugins
The 3CX CRM Integration module works with CRM plugins, allowing multiple CRM applications to be supported. The module provides out of the box integration with Salesforce, Microsoft Dynamics CRM, Sage ACT!, SugarCRM, Google Contacts, and custom plugins for other CRM systems can be easily created.
This section allows you to change plugin settings. When selected, the left pane shows a tree, which enables you to change the query order and the configuration of each plugin.
Plugin Query Order
In some rare situations, you may have contacts in different CRM systems, and may want to query every CRM when looking for contacts. In that scenario you need to define the query order. If the caller ID is matched with Contacts in more than one CRM, this setting will determine which of them is to be used. You can move plugins up and down, or press the delete button to disable it.
Plugin Configuration
When you select a plugin from the tree, the right side pane will show the configuration for that plugin. Here you will find more information on how to configure the provided plugins:
- Configuring Salesforce plugin
- Configuring Microsoft Dynamics CRM plugin
- Configuring Sage ACT! plugin
- Configuring SugarCRM plugin
- Configuring Google Contacts plugin
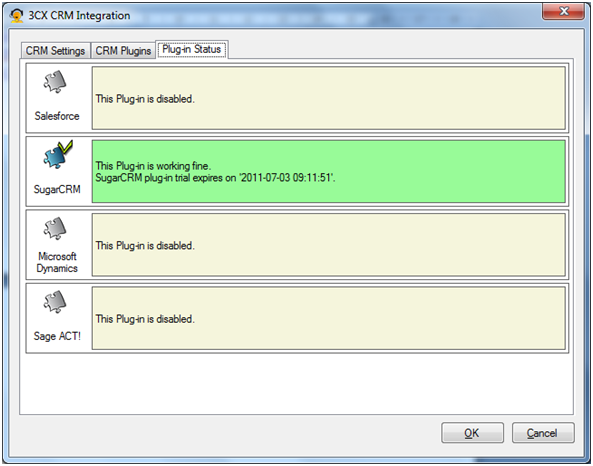
Plugin Status
You can monitor the status of each plugin through this section. You will see a row for each detected plugin (for example, Salesforce, Microsoft Dynamics, Sage ACT!, SugarCRM and Google Contacts), and information about how it’s working:
- Disabled. When the plugin is disabled, you will see it with gray background, and the according icon and description.
- Working. When the plugin is enabled and working, you will see it with green background, and the according icon and description.
- In Error. When the plugin is enabled but not working properly, you will see it with red background, and the according icon and error description.
The Screen Pop-up
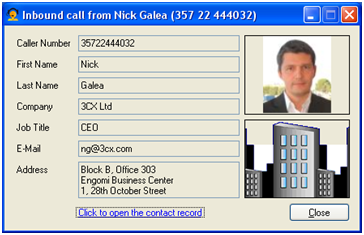 When an inbound call arrives to your extension, depending on your configuration, a screen pop-up is automatically shown, containing the related contact information that has been retrieved from your CRM.
The screen pop-up can be manually closed at any time, or you can leave it to be automatically closed by the application if you configured it that way.
 You may automatically open the contact record in your CRM by clicking the "Click to open the contact record" link.
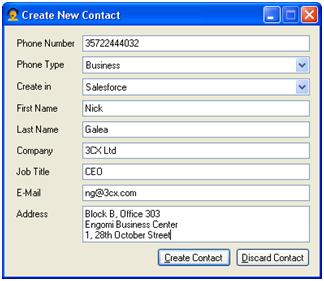
When a contact is not found in your CRM, you can automatically create it from this application. To do this, click the "Click to create a new contact record" link. The following form will be displayed, and you will be able to fill the contact information.
You may choose to create the contact in any enabled CRM. Pressing the "Create Contact" button the application will try to create the contact and will notify you about the result.
Skype Contacts
In order to make this module work with Skype contacts, you need to store them with the "skype:" prefix. For example, if you have a contact with Skype ID "MyContactSkypeId", you need to store it as "skype:MyContactSkypeId". When the 3CX CRM Integration module detects that prefix, it does not remove non digits characters when making outbound calls, so the call can be made using the Skype ID.
Also, inbound calls from Skype contacts are matched considering that prefix, so the screen pop-up will show the right information in those cases too.